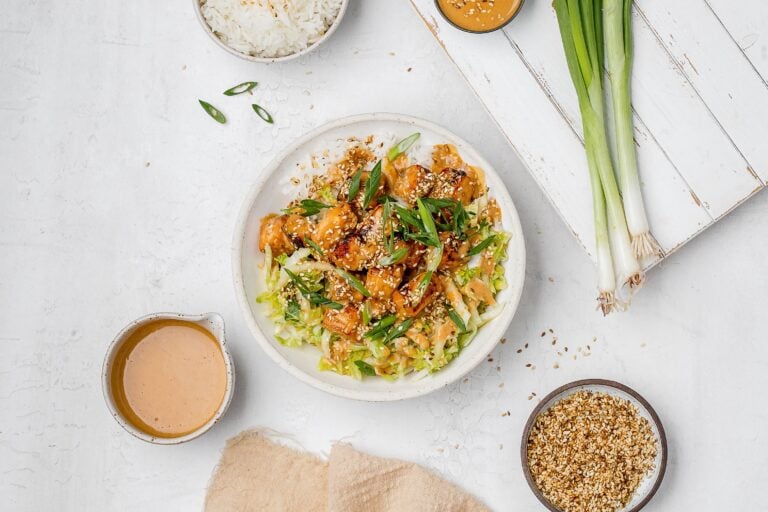
Air Fryer Chicken Katsu Bowl
This post contains affiliate links, which means I may receive a small commission at no extra cost to you. I only share products and services I have personally used and love. Disclosure here.
This crispy air fryer chicken katsu is just as deliciously crunchy as the original, with a fraction of the oil. And it’s ready in 30 minutes!
This super easy air fryer chicken katsu is made with only a handful of ingredients. Serve the katsu with some steamed rice, veggies and a delicious sauce of course. You won’t believe how crispy this chicken gets in the air fryer without being dried out. Seriously, when you slice into this air fryer chicken katsu, you won’t believe the sound of the crunch. And of course, the taste is *chef’s kiss.*

This is my version of chicken katsu made in the air fryer. I personally love making chicken katsu in the air fryer because it gets so crispy and crunchy, plus you only need a spray of avocado oil rather than a whole bunch to fry it in. You can serve it with the traditional tonkatsu sauce, or use my gochujang dip. Whichever you do, be sure to make some kind of dip or sauce because the chicken katsu is naked without it.
What is Chicken Katsu?
Chicken katsu originates from Japan and is a classic home cooked meal. It’s traditionally made with flour, egg and breadcrumbs (Japanese panko) and then deep fried until golden and crispy.
There are different versions of katsu to enjoy. You can use chicken, pork and even tofu.
It’s traditionally served with tonkatsu sauce and served with shredded cabbage.
Chicken katsu is very similar to chicken schnitzel or even chicken tenders. So chances are if you love those, you’re going to love this as well.

Ingredients
Here’s everything you’ll need to make air fryer chicken katsu at home.
- chicken breast (boneless, skinless): or use boneless, skinless chicken thighs.
- kosher salt
- cornstarch: to first coat the chicken and help form the batter and crispiness. You can also use arrowroot powder.
- eggs: to coat the chicken before the panko.
- Japanese panko breadcrumbs: panko provides the best crunch and crispy exterior. If you need it to be gluten-free, use a gluten-free panko.
- avocado oil spray: to help the chicken katsu get browned and crispy.
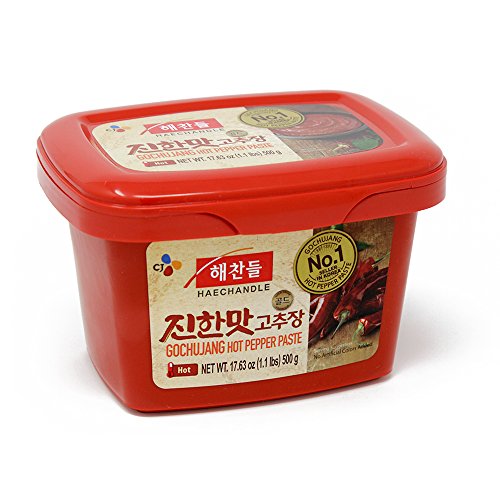
If you want to make the bowls and the gochujang sauce to dip into, you’ll need the following:
- jasmine rice (or other type of rice of your choice)
- kimchi
- sliced cucumber
- green onion
- gochujang
- mayonnaise
- water

How to Make Air Fryer Chicken Katsu
If making the bowls, cook the rice first according to package directions.
Place the chicken breast on a clean cutting board and cover with plastic wrap. Use a rolling pin (or a wine bottle) and pound out the chicken breast until flattened about 1/2″ thick and season the chicken with salt.
Place the cornstarch in one large bowl, beat the eggs in a second large bowl and pour the panko in a third large bowl.
Dip the flattened chicken into the cornstarch and shake off any excess, being sure to cover all sides.

Transfer to the egg and coat on all sides.

Then place the chicken into the panko. Be sure to cover the chicken in the panko until it’s well coated.

Place the chicken into the air fryer basket and spray well with avocado oil spray. Bake for 11 minutes, flipping halfway through and spraying the other side when flipped.

Increase the temperature and bake for two to three minutes, until crispy and cooked through. Repeat with remaining chicken. Keep the cooked chicken warm in the oven on the lowest setting.

Mix together the ingredients for the gochujang sauce and set aside.
Assemble the bowls by placing rice at the bottom, sliced chicken katsu, kimchi, cucumber and green onion. Serve while warm and enjoy!

Why You’ll Love This Air Fryer Chicken Katsu
There’s many reasons to love chicken katsu, here are the top ones.
- It’s perfectly crispy and crunchy and satisfies a fried chicken cutlet craving.
- Very easy to make with less clean up than a traditional fried chicken katsu cooked with lots of oil.
- It’s customizable to suit your needs, tastes and preferences. See my substitutions and tips for more helpful info.
- Easy to make ahead, freeze for later or meal prep with.
- The taste is delicious!

Tips
- Shake off excess flour: too much flour can make it harder for the breading to stay on the chicken cutlet. Be sure to tap off excess flour before moving it to the egg.
- Use panko: panko is used here because it’s light, crispy and provides the perfect crunch. I don’t recommend using regular breadcrumbs as it won’t have the same texture. Use a gluten-free panko if needed.
- Be sure to pound the chicken: in order for the chicken katsu to cook quickly in the air fryer, you need to be sure it’s pounded out thin, to about 1/2″ thick. You can also butterfly the chicken breast as well.
- Spray the chicken katsu well: you want to spray the chicken katsu well with a spritz of avocado oil before air frying. This helps to make sure the breading gets crispy and crunchy and browned.
- Don’t skip the sauce: feel free to use a store-bought tonkatsu sauce (or use a DIY version), or you can also use my gochujang dip. Although mine isn’t traditional, it’s tasty and I love how easy it is to make.
Substitutions
If you need any substitutions, be sure to keep these in mind.
- Gluten-free: use a gluten-free panko instead of regular panko. But, please use panko!
- Chicken breast: use boneless, skinless chicken thighs instead. Alternatively, you can also use pressed tofu instead for a tasty vegetarian option.
- Cornstarch: use arrowroot flour instead.

How to Store & Prep Ahead
Storage: If you already cooked the chicken katsu, you can store it in an airtight container in the fridge and then reheat in the oven or air fryer for a few minutes to heat it up and re-crisp it.
To do this, air fry for three to four minutes at 360ºF. You can increase the temperature for one to two minutes at 390ºF after.
Meal prep:
- Flatten the chicken and bread as usual.
- Place on a parchment lined baking sheet and place in the freezer until mostly frozen through, about one hour.
- Transfer the uncooked chicken katsu to a freezer safe plastic bag (or container) and place in the freezer for up to three months. Cook from frozen as per my instructions, adding on a few extra minutes.

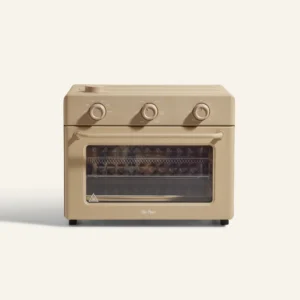
Which Air Fryer Do I Use & Recommend
I’ve tried three different air fryers over the years and here are my top two picks.
Cosori Air Fryer
The first air fryer I use and recommend is the Cosori. Here’s what I love about it:
- So crispy: this air fryer gets food super crispy, golden and brown without a lot of oil. Which is the whole point after all!
- Responsive: the digital touch is very responsive and easy to use.
- Size: it’s large enough to fit a good amount of food in it, without taking up too much space on the counter or tucked away.
- Heats up quickly: the preheat function is fast and works quickly.
- Cooks quickly: I love how powerful this air fryer is and appreciate how quickly it can cook food.
There’s not much I dislike about this air fryer to be honest. It performs amazingly well!

Cosori 9-in-1 TurboBlaze Air Fryer 6 Qt
Buy Now →Our Place: The Wonder Oven
And the second, is the Wonder Oven from Our Place. Here’s what I love about it.
- Aesthetically pleasing: as with all Our Place products, the design is unmatched. This means you can leave it out on your countertop and don’t need to hide it away in a cluttered drawer.
- Non-toxic: the trays that come with the Wonder Oven are all non-toxic and made from stainless steel and aluminum with a toxin-free nonstick ceramic coating. This is SO hard to find with other types of air fryers and is the main reason I use it so much.
- Different cooking modes: this is not just an air fryer, it can air fry, bake, toast, roast, reheat and broil. I also love the steam function for bringing breads back to life.
Here’s what I don’t like about Our Place Wonder Oven:
Less powerful: I find the “air-fry” mode slightly less powerful than other standalone air fryers.
Hard to keep clean: the door and sheet tray have gotten quite dirty over the years and it’s hard to maintain it, even after cleaning after every use.
Stopped turning off: the older version I have has also stopped turning off, so I have to unplug it all the time. The newer version could be updated and this isn’t an issue anymore, I’m not sure?
 Buy Now →
 More Dinner Recipes:
- Honey Lime Chicken Thighs with Sweet Potatoes
- Thai turkey meatballs in coconut red curry sauce
- Gochujang Korean chicken bowls with rice
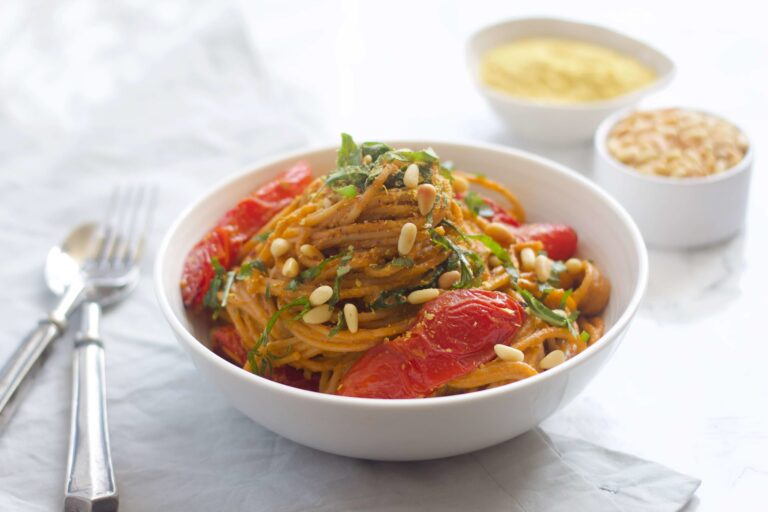
- Chili crisp pantry staple pasta
- Al Pastor salmon tacos
- Crispy Thai sweet chili chicken (air fryer)
As always, if you make this air fryer chicken katsu recipe please share with me, by tagging me on Instagram or leave a comment and/or review below. I truly love seeing and hearing form you!
This post contains affiliate links, which means I may receive a small commission at no extra cost to you. I only share products and services I have personally used and love. Disclosure here.
Print
Air Fryer Chicken Katsu Bowl
- Prep Time: 10
- Cook Time: 25
- Total Time: 35 minutes
- Yield: 4 1x
- Category: Dinner
- Method: air fryer
- Cuisine: Japanese American
Description
This air fryer chicken katsu is so crispy and perfect for slicing and serving on top of a rice bowl, with noodles or on top of a salad.
Ingredients
For the katsu:
- 2 chicken breast, boneless, skinless (about 1 lb.)
- kosher salt
- 1/2 cup cornstarch (or arrowroot powder)
- 2 eggs
- 1 1/2 cups panko (gluten-free if needed)
- avocado oil spray
For the bowls:
- 1 1/3 cups jasmine rice (rinsed)
- kimchi (for serving)
- sliced cucumber
- green onion, sliced on the bias (for garnish)
For the gochujang sauce:
- 3 tbsps gochujang
- 2 tbsps mayonnaise
- 1 1/2 tbsps water (to thin, as needed)
Instructions
- If making the bowls, cook the rice first according to package directions.
- Place the chicken breast on a clean cutting board and cover with saran wrap. Use a rolling pin (or a wine bottle) and pound out the chicken breast until flattened about 1/2″ thick and season the chicken with a pinch of salt.
- Place the cornstarch in one large bowl, beat the eggs in a second large bowl and pour the panko in a third large bowl.
- Preheat the air fryer to 370ºF.
- Dip the flattened chicken into the cornstarch and shake off any excess, being sure to cover all sides. Transfer to the egg and coat on all sides and then place into the panko. Be sure to cover the chicken in the panko until it’s well coated.
- Place the chicken into the air fryer basket and spray well with avocado oil spray. Bake for 11 minutes, flipping halfway through and spraying the other side when flipped.
- Increase the temperature to 400ºF and bake for two to three minutes, until crispy and cooked through. Repeat with remaining chicken. Keep the cooked chicken warm in the oven on the lowest setting.
- Mix together the ingredients for the gochujang sauce and set aside.
- Assemble the bowls by placing rice at the bottom, sliced chicken katsu, kimchi, cucumber and green onion. Serve while warm and enjoy!


Notes
Reheat and re-crisp the chicken katsu just before serving if working in batches. Do this in the air fryer for one to two minutes at 380ºF.